My first big project on the ZA6 was to get it to draw on a whiteboard. I was inspired and got my start on the project from these forum posts:
https://forums.tormach.com/t/tormach-za6-pen-holder/737
https://forums.tormach.com/t/3d-printing-end-of-arm-tooling/81
https://forums.tormach.com/t/drawing-svg-paths-with-za6-robot-arm/528
Marker Holder
The first step was to create an end effector to hold an Expo marker. After several iterations, I made this spring-loaded expo marker holder. It has two pieces; one flange that mounts to the ZA6 with screws and one sleeve that press fits to a standard expo marker. This allows for the marker to be easily removed from the flange screwed onto the mounting plate on the ZA6 for testing or marker replacement without having to take out all the screws. I 3D printed it and it only took about an hour on a Bambu Carbon X1:
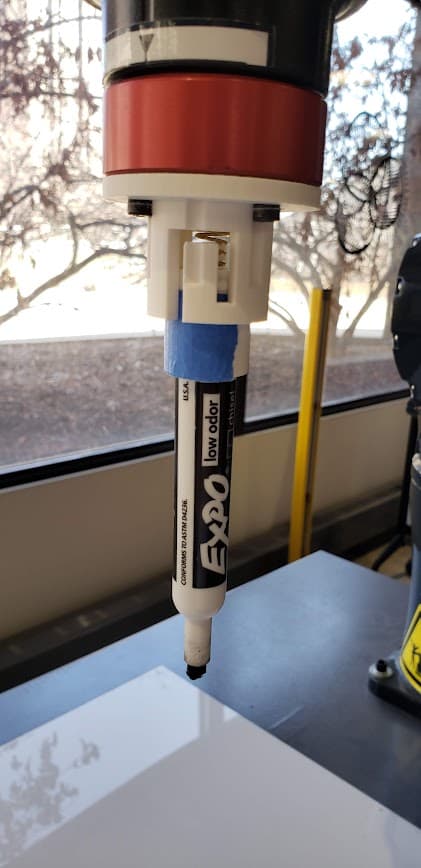

I would recommend that if you use a soft-tipped writing utensil (like a marker), that you use a relatively weak spring. Otherwise, the spring is not engaged when writing, and the marker tip just gets smushed.
Programming
This was the most difficult part of the project. I started off with the SVG drawing program from @Sadiq_Wanyaka, which used the svgpathtools Python Library. I am currently unable to install Python libraries inside the docker, but I wanted to move forward with the project. So I developed a workaround. I made two Python programs. I ran one Python file in the computer’s terminal to collect data points from the SVG file using svgpathtools and deposit them in a CSV file. Then, in PathPilot, one Python script can scrape the data from the CSV without needing to install any additional libraries.
After rigorous testing, I also developed a new section of the code to choose a path blending radius for each individual path of the drawing to make every line incredibly smooth, regardless of the distance between points. I am very happy with the performance as shown in this video:

Future plans
I plan to move forward with other projects, but I also intend to start investigating using the ROS API and accessing the docker to possibly eliminate the need for two separate scripts and improve the functionality of this project. I have already seen my coworkers use the code from this project as a good base to program the ZA6 to follow a trajectory from a CSV file (forgoing the SVG drawing part) and I am excited about other possible applications of this program.
Try it yourself!
If you want to implement the code or make your own marker holder, all the files you will need are in this Google Drive folder with a short instruction file on how to use them:
https://drive.google.com/drive/folders/1SRGWCGC94WGYiwHS2djVAH0FYZs0Gm90?usp=sharing
If you have any suggestions for or questions about this project, please let me know. And thank you to all the users who answered my questions in other posts and provided me the baseline for this project!