First ever forum post … so here goes.
Trying to produce my first part on 440 PCNC.
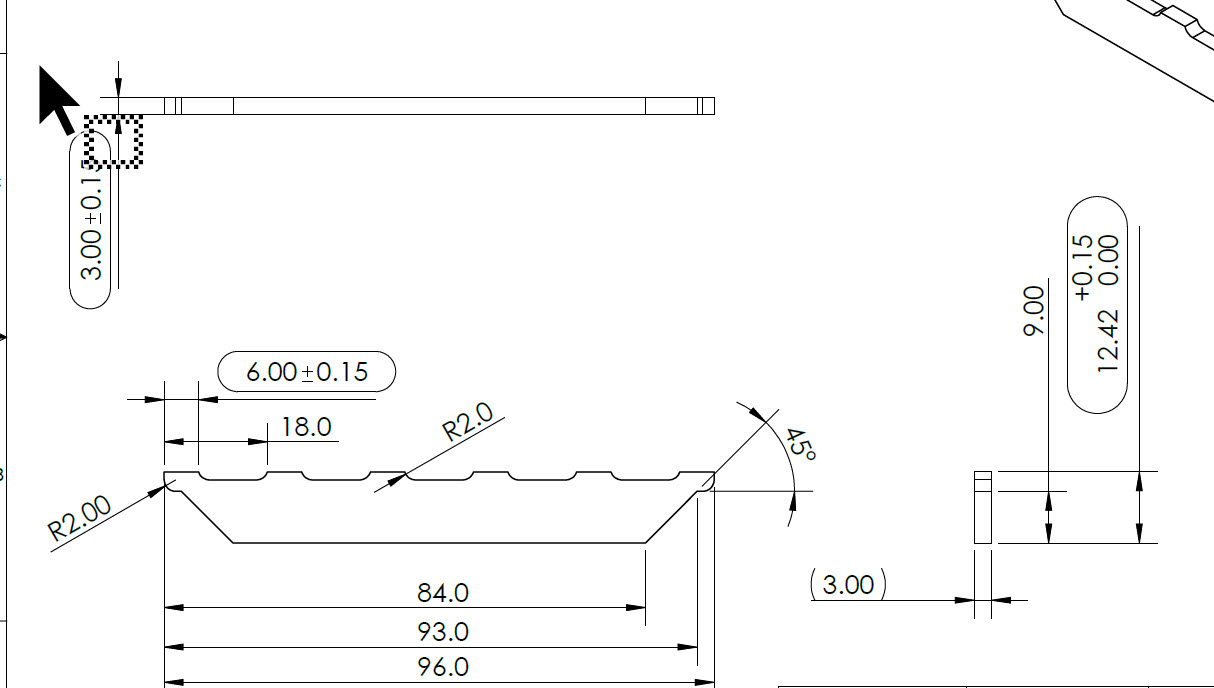
Part shown in “mm”. Material aluminum or copper.
In addition to the CNC – I have the Tormach Vise and some Saunders Machine Works accessories.
I’ve watched this video: https://youtu.be/_LPcbgoMHkk?si=PZG3x2EZwohjCgDT – really enjoy NYC CNC! I do not own vacuum fixture.
Curious how to go about building it – specifically work holding this relatively thin material?
Once have decent work holding figured out – I was going redraw/import into Fusion & try to pull it all together.
I appreciate your help. Once I build this part – promise to circle back and share beginner experiences and lessons learned. It’s been…a journey 
Thank you.
tom
1 Like
Thank you Rob.
My team is going after pain without opioids: Reneurx™ therapy has the Potential for Long-Lasting Pain Control – and this part will help me build a test fixture.
I appreciate you taking the time to share ideas. Big time.
Onward.
1 Like
I do t know what material this is but I have cut 2mm thick aluminum clamped under the dovetails on my vice.
I’ve used double sticky tape rather than tape and glue to hold .5mm copper sheet. Milling both contour and multiple depths.
Tape, either double sided or using glue between normal tape can be tricky (as mentioned) I found that using MQL and KoolMist would loosen the tape if the coolant pooled at all. I was successful using the lightest amount of coolant.
Another trick with tape is to also use small reference pins - drill holes through the material and pin in place to prevent lateral movement.
Another option is to strategically use small screws (5/40 flat head) to hold the sheet material in place and use a “tabbed” contour / profile tool path. (Should be an option in your CAM - Fusion 360 has it) I’ve used tabs as thin as .005 inch. Works well if done as the last op that cuts the outer shape of the part.
At the end of the day - If I had to make a lot of the part you posted, I’d just send it out to a place like Send-Cut-Send. I did this for sheets of a small flat part, each sheet had 20 or so parts with small tabs to cut them out.
1 Like
Thank you David.
I’m traveling for work now – but eager to explore your solutions for sure.
I appreciate your thoroughness and taking the time to share several options.
Take care.
tom